-1.png?width=552&height=678&name=text-image%20module%20desktop%20(4)-1.png)


.png?width=2000&name=Case%20study%20(21).png)


-2.png?width=422&height=591&name=text%20image%20tablet%20(31)-2.png)

-2.png?width=1366&height=768&name=Blog%20Hero%20Banners%20(4)-2.png)
-2.png?width=1366&height=768&name=Blog%20Hero%20Banners%20(5)-2.png)


Copilot agents are AI assistants made to boost what Microsoft 365 Copilot can do by linking up with your organisation’s knowledge and data. Copilot agents in Copilot Studio are known as declarative agents in Microsoft 365 Copilot.
These AI agents help you get things done, offering handy suggestions, automating repetitive tasks, and giving useful insights to help you make better decisions.
Microsoft Copilot is the platform for interacting with agents, while Copilot Studio allows you to create, manage effortlessly, and link agents to Copilot.
In Copilot Studio, you create these agents using simple, natural language instructions to produce prompts for Microsoft 365 Copilot. These agents can draw on enterprise data, carry out actions, and suggest helpful prompts.
In this blog post, we’ll explain how to build agents in Microsoft Copilot Studio. By the end, you should have a clearer understanding of how to integrate these solutions strategically into your operations.
How to Create Agents in Microsoft Copilot Studio Agent Builder
Here are the detailed steps for creating Copilot Agents in the Copilot Studio Agent Builder:
Step 1: Create an agent
Copilot Agent is configured to use generative AI and has a baseline set of default behaviours. As a creator, you can add knowledge and actions to make the agent more capable of your specific requirements.
To create a Copilot agent for Microsoft 365 Copilot:
- Sign-in to a Copilot Studio account at https://copilotstudio.microsoft.com
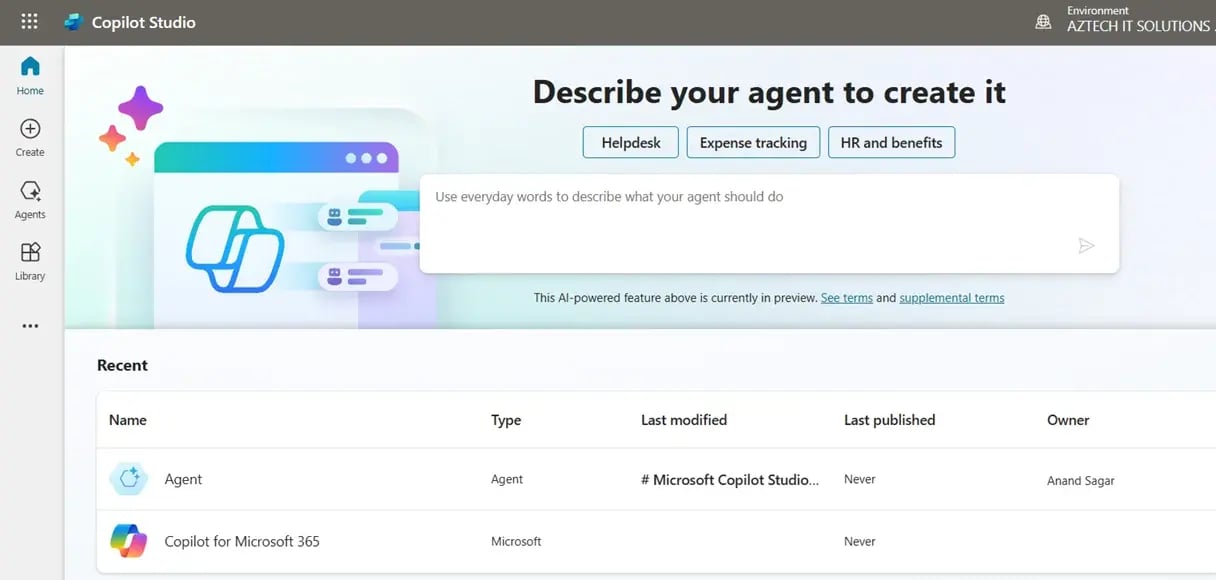
- Navigate to Agents in the left-side navigation panel.

- Select Copilot for Microsoft 365 from the list of agents.

- From here, select + Add on the Agents card. You're sent to the conversational authoring experience.

- In full sentences, describe what the agent should be able to do and know.

- When the interaction is completed, select I'm done in the chat.
- Select Create to get to the overview page for the agent.

The agent has been set up, and you can start interacting with it in the test canvas. You can also add more features or knowledge to it.
Right now, the agent doesn’t have any extra knowledge sources. It only knows what’s been included in the instructions you’ve given.
It doesn’t have access to enterprise knowledge or other actions, so all its responses come from the AI’s own built-in knowledge.
Step 2: Add knowledge to a Copilot agent

When you create an agent for the first time, it only has basic AI knowledge. It doesn’t know about any other sources of information yet. To give it more knowledge, you can add data on the agent’s Overview page or the Knowledge page.
There are three main types of knowledge you can add to an agent:
- SharePoint
- Copilot (Graph) connectors
- Web search
To start adding knowledge to your agent:
Go to the Agent Overview page.
On the Knowledge card, click + Add Knowledge.
Pick a data source:
SharePoint: Enter the root path of the library or site. At the moment, you can’t add a single page or file.
Copilot Connector: If your admin has set up a Graph connector in Microsoft 365, you can select it from the list of available data sources.
Web Search: You can turn this on or off from the Copilot Overview page under the Additional Settings card.
Once the knowledge sources are set up, the agent with the information is ready to use in the test chat. Close the knowledge panel, refresh the test chat by tapping the refresh icon at the top, and then try asking questions based on the data source.
Step 3: Add an action to a Copilot agent

Actions let an agent get information or carry out tasks, like updating a record or completing a transaction. You can create actions using Copilot connectors (also called Power Platform connectors). There are different types of actions, including AI Builder prompts, connectors, flows, and custom connectors.
To add an action:
- Go back to the agent's overview page.
- On the Actions card, click Add Action.
- Look for the Copilot connector you need or choose to create a new flow or add an API for a custom connector.
- If you pick a Copilot connector, you’ll see a user-friendly interface with Connector and Configure sections.
Once the action is added, you can test your agent. Here is the sample below:

Step 4: Edit Starter Prompts
When you use the conversational experience to create your agent, Copilot Studio automatically generates starter prompts for you. You can tweak these prompts or create your own at any time using the Starter Prompts section on the Overview page.
With starter prompts, agent creators have full access to the features of the Microsoft 365 Copilot large language model, including the actions and knowledge you’ve added. Think about designing clever prompts that make it simple for users to complete everyday tasks. You can include up to six questions.
Here’s a sample screenshot showing how to edit a starter prompt.

Step 5: Publishing Your Copilot agent

When your agent works just how you want in the Copilot Studio test experience, it’s time to publish it.
To publish your agent:
- Go back to the agent’s Overview page.
- Click Publish in the top-right corner.
- Fill in the necessary details and hit Publish.

That’s it—your agent is live now and published to Microsoft 365 Copilot and Teams.

Step 6: Availability Options

The Availability options page lets you share the agent with members of your organisation. Shared users can access the agent in Microsoft 365 Copilot using a link.
You can also share it with your teammates, other shared users, or even everyone in the company. You can download the agent as a zip file and upload it as a custom app in Microsoft 365 Copilot if needed.

How Copilot Agents can meet your business needs
 source: Microsoft
Copilot agents are AI assistants designed to tackle specific tasks, like managing business processes or learning new skills.
They make Copilot much more effective in three key ways: by focusing on specific knowledge (like Microsoft SharePoint files or other external content), adding new abilities (like updating records or creating support tickets), and automating business processes so they can run independently.
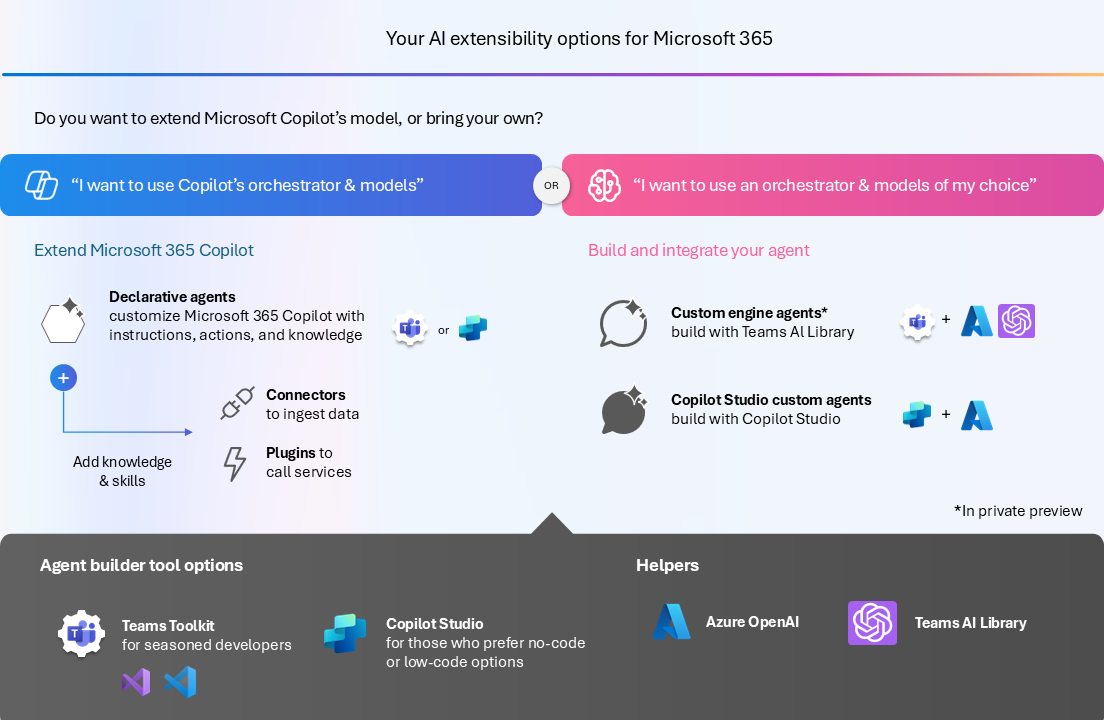
The type of agent you create depends on what your organisation needs. Declarative agents use Copilot’s built-in engine, where its orchestrator and foundation models handle prompts.
Unlike custom engine agents, declarative agents don’t require you to set up your own AI platform or deal with tricky technical decisions.
Plus, they come with built-in access to indexed Microsoft Graph data, including files stored in SharePoint or OneDrive.
If you’ve already built an API plugin or a Microsoft Teams message extension, you can easily turn it into a declarative agent by simply adding instructions to its manifest.
You can now build custom engine agents, currently in private preview, using any orchestrator or large language model (LLM) platform, such as Azure OpenAI Service.
These agents are designed with custom LLMs and orchestrators, meaning they can be tailored to specific needs, industries, or more complex scenarios.
They can also be used as standalone apps in Teams and are available to Microsoft 365 users, even if they don’t have a Copilot licence. This opens the door for solutions from independent software vendors (ISVs) and systems integrators (SIs) to reach a wider audience.
Assessing Your Business' Readiness for Microsoft Copilot Studio
Before implementing Microsoft Copilot Studio and Copilot Agents, it's essential to assess your business's readiness. This includes evaluating your current infrastructure and identifying potential hurdles that may arise during the transition.
Assessing Your Current Business Software Infrastructure
The first step is to take a close look at the software your business is already using. Understanding the tools and systems you rely on will help you figure out how well they’ll work with Copilot Studio.
It’s also important to think about whether your current setup can grow with your business. If you’re planning to expand, make sure your systems can handle the extra demands and challenges that come with using new AI tools.
This means looking at what you’re using now and thinking about what you’ll need in the future based on your goals. Talking to people from different teams in your business can give you useful ideas about how your systems might need to change to support a more AI-focused way of working.

Identifying Potential Challenges and Solutions
While Microsoft Copilot Studio has plenty of benefits, it’s important to recognise the challenges that might crop up. One big issue is often resistance to change from staff.
To tackle this, it’s crucial to explain clearly how Copilot solutions can make their work easier and more efficient. Organising training sessions and workshops can help ease concerns, showing employees how these tools can be used in their daily tasks. This can encourage innovation and help them adapt to new ways of working.
There may also be technical challenges, like ensuring data security and meeting regulations. Working closely with IT teams will be key to sorting these out and making the transition as smooth as possible.
Final Thoughts
On top of this, creating a dedicated team to manage the integration process can make a big difference. This group can focus on building a strong system for managing data and making sure all AI tools follow industry rules and best practices.
If you're interested in learning more about Copilot Studio and exploring how you can create your own AI Agents within the platform, you can reach out to one of our AI Experts. They can provide you with detailed insights and guidance to help you get started on your journey with Copilot Studio.